Tuesday 5 February 2019

Where have you been?!

Where have you been?!

I’m back! It’s been a while, I know. But I have a good reason for my absence I swear.. I got bitten by the travel bug!

In 2017 I went to America to work at an all girls summer camp for 2 months and traveled around the East side afterwards! 

In 2018 I travelled around Thailand doing some really amazing things that I never thought I’d get to do. I also went to France and traveled around Ireland a little!

In between these travels I have just been working as a Pre-School Teacher for the last 3 years. Since travelling, it’s made me realise that I neeeeed (like, pshyically neeeed) to travel more! And I suggest if any of you guys and gals get the chance to do the same, DO IT DO IT DO IT! 

It sounds so cliche like “omg travelling changes you” but like omg, it does. Just seeing different cultures and different people and different ways of life has such an effect on you! Our little towns are too small to stay in forever. 

So long story short, I’ve decided to go back to college to get my Masters so that I can get a job that gives me more time off to travel! The last time I wrote here I was in college...so I figured why not get back into it! 
Ohhh I’ve missed you guys!!!

Some things you will see in upcoming blog posts;
  • Makeup 
  • Skincare
  • Hair care (specifically blonde!)
  • Travel
  • DIYs
  • Self care
  • Minimalistic living 
  • Hauls 
  • All kinds of hacks & tips
  • Some outfits thrown in for good measure!

Ahhhh it’s good to be back!
Let me know if there’s anything else you would like to see.


Love & Hugs, Lora xo 
Read More »

Sunday 28 August 2016

Skincare Sunday: Loreal Purity Face Mask Review

Loreal has released 3 new face masks, there's a purity one, a detox one and a brightening one. 

I got the purity one and I used it for the first time last night and man, I fell in love.


The Formula
It's a clay mask so it's grey in colour and it's quite cool and smooth to apply. It has a mild man-ish smell, like it reminds me off a men's body wash!!! It's not too smelly on your face though so I don't mind that :-) 


The Process
It's thick so it's quite hard to apply evenly so parts of mine dried faster than others :-P 

As I said, it's cool and smooth going on and it did tingle a little on the face as it was drying. 

It does dry completely though, as in like don't expect to be able to smile! It gets really tight!! It says to wash off after 10-15 mins but I only left it for the 10 because that face was TIGHT!!


The Removal
I used warm water to remove, it feels a little slimey coming off :-P

It does come off easily enough though with just the warm water. There's no residue on the face afterwards which is good. 

My face felt really smooth and fresh, and it was very matte like the product promises!

The Results
I finished by adding Garnier's new moisture bomb night gel and headed off for that beauty sleep.


In the morning my skin was still soft and not overly oily like it usually is. My little breakout areas were mostly dried up and I had no new face demons, yassss gurl ;-)

The Aftermath 
So far I'm really loving it! This mask is recommended to be used 3 times a week so I will keep that up and let you guys know how I'm felling once the tub is finished :-) 


UPDATE: I've used this mask 3 times this week now and my skin has never looked better. My redness is gone, I have no spots or dry patches.. My skin still gets oily throughout the day though! Still loving it :-) 

Hope you guys enjoyed this post, have you tried any of the new masks?:-)


Love & Hugs, Lora xo 


Read More »

Monday 11 July 2016

Makeup Monday: Kylie Lip Kits Swatches & Review

So I gave in and got one from each collection! I got one lip kit, one metallic and one gloss :-) 


I live in Ireland and the shipping cost was €15! So Irish guys and dolls keep that in mind if your thinking of getting some. 


The Lip Kit
I got Koko K, a gorgeous pink nude colour. The lip kits are $29 each.


The Colour
It's a pink shade with a slight purple tinge to it on my lips 


The Formula
It's quite a thick, soft moussey consistency and it smells like candy! 
It takes a few minutes to dry fully matte. 

I like that it can be layered and touched up without causing any bits to crack or crumble off!


The Longevity 
It lasts around 4-6 hours, depending on what your eating! It started to wear off on the inside of my lips as I was eating and drinking throughout the day. 


The Metallic 
I got Hier, a peach toned metallic lip. These are $18 each.


The Colour 
It's a gorgeous peach toned lip with tiny subtle glitter flecks to it. 


The Formula 
This one is quite streaky going on and that probably because of the tiny glitter flecks in it. It takes a couple of layers to perfect. 
It also smells like candy! 


The Longevity
It only lasted around 3 hours before it started to wear off on me. It started to flake off in the centre of my lips.


The Gloss 
I got Literally, a brown toned gloss. These are $15 each. This is the mid toned brown gloss, there is a lighter one and a darker one available. 


The Colour
It's quite dark on me with my pale skin tone. It would probably suit a darker skin tone. 


The Formula
It's. So. Sticky. Do not wear on a windy day unless you want to peel your hair off of your lips all day!!


It feels smooth to apply but the colour is quite streaky. The stickiness though, I can't get over how sticky it is. 

I wish that it wasn't sticky because it's super glossy on the lip!

The Longevity 
Only lasts until you eat or drink/ get so sick of everything getting stuck to it!! LOL. I can't wear this gloss unless I know I'll be inside the whole time I'm wearing it! 


So that's my very honest opinions on the Kylie collections so far. Let me know what you think of them in the comments below!

Love & Hugs, Lora xo

Read More »

Wednesday 29 June 2016

DIY Wednesday: Cooling Face Spray

With the hot weather in full swing this summer I thought it would be a great time to show you guys how I make my DIY cooling mist for the face and body :) 

You will need;
1️⃣ a spray bottle (I use empty makeup setting spray bottles)
2️⃣ water
3️⃣ kettle 
4️⃣ green tea bags (or tea bags or your choice!)
5️⃣ bowl 

I chose camomile and honey tea bags, great for combination skin :)


Step 1
First you want to open up your spray bottle and give it a good clean so that there is no residue of anything that was in the bottle before :) 

Step 2
Stick the kettle on! You'll want to boil a good bit of water here, depending on the size of your spray bottle. 

Step 3
Add the water into the bowl and add 2/3 green tea bags. Let them sit until the water cools down completely. 


Step 4
Once the water is completely cool you can add it into your spray bottle :)
 
Your water should change colour at this point :)


Step 5 
Spray spray and cool away :) 
This concoction is completely natural so you can use it on your face and body :)
 
I used an old setting spray bottle and jazzed it up with washi tape and glitter :) 


It's a great way of cooling down in the hot weather, and the best part is you can use it over your makeup :-) 

If you have any mixture left over you can make another one with a different spray bottle or you can add ice to a cup and have some refreshing ice green tea ;-) it's a win win really :-P

Hope you guys enjoyed this little DIY :-) if you have any other tips and tricks for staying cool in the summer then feel free to leave a comment below :-) 

Love & Hugs, Lora xo

Read More »

Sunday 26 June 2016

My Latest Addiction: Playsuits!

Lately I'm all about a good playsuit, they are so handy to just throw on and you have a complete outfit :) 

I've gotten 4 this week so I thought I would show you guys some decent plus size playsuits :-)

For those wondering, I'm a size 14, I'm short and big chested! Some of the playsuits I got are quite flattering so if you have a similar body type to me then you might find this helpful :-)


1️⃣ Boohoo.com
I got 2 playsuits from boohoo, 2 very different ones indeed :-P 

The first is this classic black one with a low plunge wrap around neck line. 
The elastic in the middle sits nicely on the smallest part of my waist and the flowy shorts are perfect if you want to hide a thicker thigh :) 

It is made with soft cotton material and has long sleeves so you can wear it through summer/spring/Autumn here in Ireland!

The long sleeves are also great for hiding any bingo wings you may have got going on ;-) 


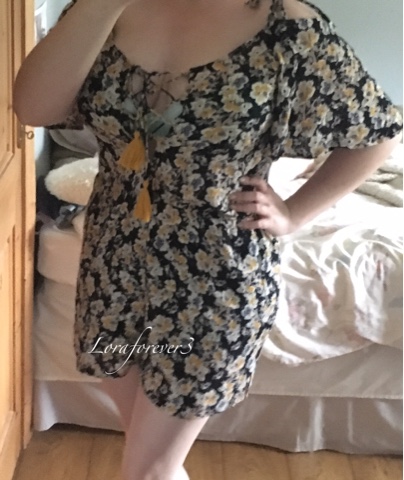
The second playsuit from boohoo is this gorgeous navy with yellow floral print one. 

It has a tie up bust which is very on trend at the minute. I, however am too busty to pull this off as anytime I wear this playsuit I am constantly playing peek a boo with my bra!!

It has short sleeves, they just about hit the elbow on me but they have lovely little shoulder cutouts and a small strap for your shoulder :) 

The shorts are super flowy too, looks like your wearing a dress :) 
It's a nice summer/spring dress and can be worn with tights for colder evenings! 

The only possibly bad thing I'll say about this playsuit is that if your quite busty then the tie up part will show that off quite a bit, could be good and bad, depending on how much skin you personally like to show :-) 

Hello mint bra!!! See what I mean? :-P


2️⃣ River Island
The next playsuit I got was €25 in River Island! It's a size small but if fits me perfectly!

The elastic waist sits nicely on the smallest part of my waist again, and the material is nice and light weight.

This also have short sleeves and shoulder cut outs with a little strap. 


It's quite short so definitely more of a hot summers day outfit :) 


3️⃣ Forever 21
I love the colour and pattern of this one, it's a camel colour with navy floral details on it. It's got no sleeves but has a thick strap. 

I got this for €15 in a size L but busty ladies be warned, it's very tight in the chest area! 

I would love to be able to wear this one but my boobs look a bit bet into it!! Still a gorgeous playsuit though! 


And there you have it, some great playsuit ideas for the chunkier lady :) 

Hope you guys enjoyed this post, if you'd be interested in seeing more of my summer outfits let me know in the comments below :-) 

Love & Hugs, Lora xo
Read More »

Monday 20 June 2016

Makeup Monday: My Inglot Collection

I have a small but growing inglot collection that I'm going to share with you today along with a mini review for each :) 

I have the gel liner in number 77, which is jet black!
The eyeshadow pigments in number 273 and 14,
And the Duraline oil primer!

Gel Liner

This comes in a little pot so you will need a liner brush for it. I got the inglot liner brush for it and I used it a few times but it's not great to be honest! 


I mostly use a super cheap Essence brush that I got in penneys, it works really well with the product, the brush hairs are stiff so you get a more defined line. 

The inglot brush hairs are too soft for me to be able to get a crisp line with! 
The brush was €16 so it ain't cheap bro! 

If your not that good at eyeliner then I definitely suggest sticking with a bottle liquid liner as this gel liner does take some getting used to and its in no way forgiving if you make a mistake!!

I've also heard some reviews saying that the product dries up quite fast, but I've had it for about 6 months now and I keep it tightly sealed and away in a drawer and it's still going strong but I'll keep you updated on that :-) 


Pignents
The first pigment I have is a gorgeous copper shade, it's shimmery with a slight glitter to it. 

You will get some fallout with the pigments if you pack to much onto your brush so I like to do my eyes before my foundation if I'm using these :-) 


You get so much product in these little tubs! And the pigments are so finely milled that it makes them like butter on the eyes, so easy to blend! 


They are super pigmented though so you will only need once quick swipe and your lid will look like a shimmery goddess :-) 


The second pigment I have is number 14 and it's a beautiful rose-White shimmery sheen colour. It's perfect for your inner corners to give it that pop! 


I like to use it on my inner eyelid and I place a tiny dot around my tear duct area to give a super highlighted look. 

Here are the two shades swatched on my hand... 
They look very similar in the pots but are so different swatched and on the eyes :)

The pigments are €16 each. 

Duraline
I also got this primer oil (€15) as the girl in the shop said it acts like Macs fix plus as it gives your pigments that extra metallic bang. 

She also said that this product lasts for years as you only need a tiny drop each time you use it! 


I tested it out with both the pigments but I find it does nothing to the colours. However, it acts like more of a primer to me. It holds the pigments on ALL DAY, there's no wiping them bad boys off! 

I tested it out on my hand the first day I got it and the swatches with no oil primer wiped away within seconds, but the swatches with the primer wouldn't budge! 

So if your looking for a nice oil primer for your lids then I definitely recommend it. 

It's also good for creating a 'wet' eye look. I've seen this trend floating around for a while now, if you apply whatever eyeshadow look your going for and then use your finger to dab a drop of the oil primer on top of your shadows then it makes a really cool wet look! 

I hope you guys enjoyed reading my thoughts on my current Inglot purchases, if you've tried any Inglot cosmetics let me know what you thought in the comments below :-) 

Love & Hugs, Lora xo 
Read More »

Sunday 19 June 2016

Skincare Sunday: Lush Cosmetic Warrior Mask Review

I picked up this mask a few weeks ago to try and eliminate my lingering breakout once and for all. The girl in the shop said that its good at calming the face down and that it cleanses deep into the skin.


Before we get into the review I'll let you know what skin type I have.
So I've literally got everything skin. I have oily areas and dry areas, as well as normal areas! 
I'm prone to small breakouts and I have many old acne scars around my jawline! 

And now that you know that, here's my review :-P

Consistency:
It's super thick and has little brown flakes of something up in there, I have no idea what they are and I hate putting them on my face! For no reason other than the fact that it feels gross! I'm immature really :-P


Closeup 😋


Scent:
Omg the smell... The girl in Lush told me it has garlic in it so the first thing I think is does it smell bad??? She said it's not too bad because the tea tree in it covers up most of the garlic smell... So I'm like ok let's give it a shot. 

I gave it a quite sniff in the shop and I was like yes it stinks but if it works I'll be able to look past that :-P

And omg does it smell! It's bearable though and after the first application I was able to zone out the smell! 

Still, be warned if you have a sensitive nose! 

Application:
This mask has to be kept in the fridge for freshness so it feels so nice when you put in on your face, very cooling and calming. 

It's thick so it doesn't go dripping anywhere which is good! 

Just look at that thickness :-P


It says to leave the mask on for about 10-15 minutes. It dries up mostly by that point so you definitely don't want to leave it on any longer than that...

The first time I tried it I left it for about 30 minutes and it started to flake off whenever I moved my face! 

Also, as there's tea tree in it some people might find it quite drying so definitely hit up your moisturiser after using this mask.

You can also use this mask as a spot treatment directly on the breakout area, that would definitely decrease the smells your gonna get hit with!

Removal:
It's actually quite tough to remove after it dries up on your face, it does need a bit of elbow grease to get some parts off, like around your nose, and definitely don't put it up near your hair line because it is so hard to get out of any little hairs it attaches itself to! 

Oh and I literally can't stand removing this, as soon as you hit it with the water it turns into a super slimey feeling on your face, and the smell comes back ten fold!

My verdict:
I know this has seemed like a pretty negative review so far but the WORST part about it is.... I love it. 

It works so well at calming my breakouts and it really does cleanse the skin. My skin feels so smooth and soft afterwards.

I've been using this mask one to two times a week and it's completely stopped any new breakouts from forming. It's even started to fade some of my old acne scars! 

It's worked wonders on my skin and that's why I've learned to look past all the nastiness!!! 

Would I recommend? 
If you think you can look past all the smells and the feels then definitely give it a go, especially if your prone to breakouts! 
It's full of really good natural ingredients like garlic, tea tree and honey which are all great at fighting spots. 

So I say give it a go... If you dare ;-) 


I hope you guys enjoyed my honest review! If you've tried this mask or have any suggestions for breakout prone skin then feel free to leave a comment below :-) 

Love & Hugs, Lora xo


Read More »

Monday 23 May 2016

Makeup Monday: Max Factor Lipfinity Swatch & Review

Hello beautiful people! This weeks makeup Monday instalment is all about an amazing long lasting liquid lipstick that I have found. It lasts ALL DAY! 

It was an impulse buy, I've never heard anything about them before but I'm glad I went with it!! 


It's the Max Factor LipFinity in the shade 'Always Delicate'

It's comes with the liquid lip colour and a moisturising balm so you can leave it matte or add the balm to turn it into a juicy gloss :-) 


The Price
I got this for €15 in boots so it wasn't cheap. But considering it lasts all day it's definitely worth it :-) 

The Colour
Here is a lip swatch of the lipstick and balm together, I love the pink rosey colour :-)


The Longevity
It lasts through eating and drinking with and without the balm so it's already one of my faves :-P 

The Formula
It has a creamy consistency and the balm is super moisturising. It doesn't have a strong smell of anything either which is always a plus :-) 


Have you guys tried any of these Max Factor Lipfinitys? Let me know what you think :-) 

Love & Hugs, Lora xo


Read More »

Wednesday 18 May 2016

Kylie Jenner Metal Lipgloss Dupe?

This colour! I really love Kylie's latest lip shade 'Hier' but then I saw this bad boy ;-) 

This is one of the Me Now matte liquid lipsticks, I've reviewed some of these before so I'm no stranger to these super cheap super awesome lippies :-) 


This one is the closest thing to Kylies Hier shade that I've come across, and it's only €1! Can't beat it :-) 

Here they are swatched side by side...
You can see here that Kylie's (left) is more peach toned where the Me Now one (right) has more of a pink tone to it.

Here they are side by side on the lip...
Again, the Me Now (left) is just slightly more pink toned than the Kylie colour (right). 

Which one do you prefer?

Although they are similar they aren't an exact dupe! But they're close enough for me :-) 

The Formula
The formulas aren't too far off each other either, although Kylies one smells like cupcakes and the Me Now has a slight chemical smell, but you can't smell either when they're on the lips :-) 

The Longevity
If you have had any experience with the Me Now lippies then you already know which one lasts longer ;-)

The Me Now lasts waaaay longer than the Kylie one, Hier lasts a good few hours but the Me Now is good to go all day! 

So if your loving the shade Hier but not loving the price then I'd definitely recommend trying out the Me Now. They have tons of different shades too and at €1 a pop sure you couldn't go wrong!! 


Have you guys found any Kylie dupes? Feel free to share them below :-) 

Love & Hugs, Lora xo

Read More »

Sunday 24 April 2016

Skincare Sunday: Jolen Bleach For Body Hair

If your like me and have dark arm/body hair and your in the mood to lighten it then come and try the Jolen Bleach with me :-P 


I got this in Boots for €15, this is the bigger tub but you can get a smaller one for around €10. 

I'm literally testing this out as I type so you are getting a true first impression! 
So here are the products that come in the box...


You get a cream, a powdery substance and a little tab and spatula to mix them together! 


So let's get into it! It says to mix 2 parts of the creem to 1 part of the powder to form a paste like so 


Just work in enough powder to make the cream a little gritty! 


And then you whack it on! I'm lightening my arm hairs here so let's see how it goes :-P here is a before pic...

Yo nasty ;-) 

So it says to leave it on for 15 minutes and to remove a little patch to see if you have reached your desired lightness ;-) 


I had to leave it in for about 25 minutes to get mine nice and light. Here is my before and after pic..

Nice and golden after!

It's safe to say this product definitely works! Right off the bat you get a very strong bleach smell but it's tolerable if you keep your arms at a safe distance from your nose!!!

And look at my arms now, super light fair hairs now for the win ;-) 


Now I'm off to get a spray tan so I don't look so pasty white anymore :-P

Waaaaay better tanned!! :-)

I would definitely recommend this product for anyone looking to lighten their body hair, it's cheap and quick and most importantly, it works!!!! 

Hope you guys enjoyed this quick first impression, if you would like more posts like this feel free to let me know :-) 

Love & Hugs, Lora xo  
Read More »